Limited Time Offer: Enjoy 10% Off All Services
Get a quote now – this discount won’t last long!
We show you how to calculate errors in your surveying dumpy level and provide a free online two peg test calculator.
Article By: Tom Ayre | Last Update: November 2020
Establishing whether your surveying dumpy level has an error is important to ensure you can accurately set survey levels on your construction site.
In this guide, we will show you how to check your dumpy level instrument for height errors using a two peg test.
We have also provided a free to use, online, two peg test calculators.
A two peg test checks whether your dumpy level is capable of showing a true horizontal reading. This is vital to ensure your measurements are accurate and reliable.
The two peg test tells you the measurement that your level is out over the distance you test over. If the two peg test is showing an un acceptable error, then you must withdraw the equipment and get it serviced by an appropriate company.
Step 1
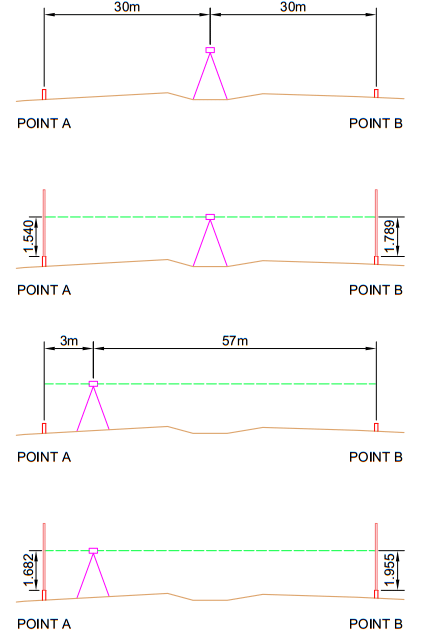
Measure out a 60-metre line on a relatively flat piece of ground. Mark the ends of the line with a timber stake (or nail, or spray mark) and securely hammer them into the ground, so they are nice and solid.
Step 2
Set up your dumpy level halfway between each of the pegs (30 metres along the line). Once you have done this, ensure your dumpy level is levelled using the precision levelling thumb screws.
Step 3
Once levelled, using another person, place your staff on point A, and record the height of the peg as accurately as possible. Write this figure down, labelling it as “P1 – PEG A”.
Step 4
Next, do the same at point B and record the height as “P1 – PEG B”.
Step 5
Now, move your dumpy level to approximately 3 m away from point A, set up and level the instrument.
Step 6
Record the height of point A and Point B again and write these figures down. Call them “P2 – PEG A” and “P2 – PEG B”.

Now you have your 4 recorded points, you can begin the simple process of working out your survey errors. I have added some example data below to show you the process:
P1 – PEG A = 1.540 m
P1 – PEG B = 1.789 m
P2 – PEG A = 1.682 m
P2 – PEG B = 1.955 m
First off, start by subtracting P1 – PEG B by P1 – PEG A
1.789 – 1.540 = 0.249
Then do the same thing for P2 – PEG A & P2 – PEG B
1.955 – 1.682 = 0.273
In this example, you can see the differences in heights between the 2 positions were 0.249 m and 0.273 m. The difference between these 2 numbers is:
0.273 – 0.249 = 0.024 m (24 mm)
Because you are seeing an error of 24 mm and not 0 mm, it is indicating that your dumpy level is out of level and could potentially require a service.
In a perfect world both these numbers would be exactly the same which would indicate no issues. It is up to you to clarify what errors you are happy with.
If you are getting high errors, consider undertaking the two peg test a few times and seeing the differences in results.
Below, we have provided a free to use, two peg test calculator. We hope it helps!
Whilst producing this blog article, we found a useful YouTube video guide, which can be seen below!
92 Bellhouse Lane, Leigh-on-Sea, Southend-On-Sea, Essex, SS9 4PQ
76 Quill Street, Finsbury Park, London, N4 2AD
THS Concepts has a passionate team of surveyors and CAD draughtsman delivering detailed, thorough and accurate surveys and CAD drawings. We are far more than just a land and building surveying company.
Terms & Conditions | XML Sitemap | Copyright 2022 – THS Concepts LTD