SPRING 2024 SALE

Limited Time Offer: Enjoy 10% Off All Services
Get a quote now – this discount won’t last long!

How To Accurately Measure a Building: a Low Cost Guide

Use low cost equipment to accurately measure a building. Read our detailed guide below!

Article By: Tom Ayre
Last Update: January 2024

In this article, we explain, in simple terms, how to undertake your own measured survey of your house, office etc! We explain the measurement techniques used at THS Concepts to accurately record details about your project.

Learning how to do your own measured survey can help save money on your building project. Saving the expense of paying a survey company or architect to measure your property can also save time and potentially get your project moving along quicker.

Before we start, here’s a quick introduction:

Need a Measured Survey Quote?

Table of Contents

Video Explainer Guide

Tools & Equipment

 Laser Distomat + Spare Batteries

A laser distomat is much more useful than a standard tape measure. A laser doesn’t sag over long distances and can be used to measure features quite far away.

We recommend using a good quality brand such as Leica. We have found these lasers to be extremely durable and reliable. They are often shockproof with accidental drops no problem.

At THS Concepts we use the Leica X310 laser. Amongst a lot of other features, a really useful element is that it can measure vertical angles which makes measuring between floors a much easier task!

Tape Measure

Like the laser distomat, we recommend using a decent brand of tape measure to ensure your measurements are reliable and accurate. A poor quality tape will eventually let you down. We recommend a 5m tape which is a little easier to put in your pocket than an 8m tape measure.

Notepad

A quality A4, hard-backed notepad from a brand such as Black N’Red is highly recommended. The hardback element is important as throughout the survey you will need a hard surface to measure and draw up your notes; often properties are empty with no tables to lean on. Additionally, using a squared notepad makes life a lot easier when it comes to drawing the property. The squares act as good guides to get a reasonably accurate sketch drawn out.

Mechanical Pencil

Use a good quality mechanical pencil that won’t break the moment you apply a bit of pressure to the nib. We use mechanical pencils with a rubber on the end so that elements can be easily rubbed out and re-drawn.

Multicolour Pen

A multicolour retractable ballpoint pen (the kind you had in school!) is really useful. The various colours can show different measurements such as ceiling heights, long dimensions, floor heights etc. Distinguishing these on your survey notes is important as your sketches get more and more complicated.

Camera / Phone

Having a quality digital camera or phone capable of taking good quality photos is important. Taking plenty of photos and sometimes videos on site are helpful when it comes to drawing up. Used in combination with your survey notes it will jog your memory when it comes to the complicated areas of the survey.

Personal Protective Equipment (PPE)

Depending on the site you may need some health and safety equipment. It would be worth checking the type of property before you arrive. If the building is residential and in use, it will be safer than a building site and you will need to carry less equipment.

Where PPE is required, it is usually a minimum of steel-toe-capped boots, high-visibility yellow vest and an approved hard hat. If you are working on a particularly dusty construction site sometimes it is suggested or required to wear safety gloves and glasses.

Prior To Arrival

Before you even get to the project it is a good idea to research and find out as much information as you can about the building. Before arriving on-site you can use tools such as Google Street View to get an idea of the building’s shape and size. This will help to give you a good idea of the size and complexity of the project.

Another great tool that we can use in the United Kingdom is the planning department of the property’s local authority. We have had reasonable success in the past looking up the address of a property for older planning applications that might show old floor plans. If you cannot find an old floor plan then sometimes looking up the neighbouring properties this can give you a good idea of the layout.

It is a good idea to know exactly what the purpose of the survey is for and the accuracy required. If you are measuring a floor plan for an estate agent’s brochure, the measurements don’t need to be too precise. If, however, you are using the drawing as a basis of a planning application then it is important you get the accuracy as precise as possible. Sometimes measured survey drawings such as sections or elevations aren’t required, and knowing this in advance will save time on site as you won’t have to pick up height details, etc.

Before you arrive at the property, it’s advisable to have a good idea of which floor plans, elevations and sections you require. Write these down in your A4 site book so you can easily keep track of them. If your brief has specified locations of sections, you must understand what’s required so that you can ensure you pick up the correct details.

Before leaving for the site, check the equipment you are taking and ensure you have brought everything. Have you got spare batteries for your distomat, is your camera charged, have you got your protective equipment?

You should check travel arrangements for how you are getting to the job. If you are going via car then use Google Street View to check the streets nearby for parking restrictions. There is nothing worse than getting to a site and having to park miles away, making you late for your client!

Depending on the type of site you are visiting, you may require health and safety documents such as a method statement and risk assessments. These are usually required on more formal construction sites and sometimes need to be submitted well in advance of arriving on site. It is worth gauging with your client as to if you need to issue these documents which are sometimes jointly known as “RAMS” (risk assessments/method statements). Ideally, you should have these documents ready to go for your staff for any type of job they do!

Arrival At Property

Once you have arrived at the property greet the property owner or Site Manager. On a formal construction site, it is common to receive a site induction introducing you to the main hazards on the site, fire escape routes, PPE requirements etc.

Before you start any sketching it is highly advised that you walk around the property from top to bottom to get an idea of the scale and size. Whilst doing this you can form a plan in your head as to which floors to start on, depending on whether there are certain types of construction work going on or simply if you cannot access a room. In residential properties, for example, the owner may have children currently sleeping.

Getting an idea of the building layout is important as it helps you get useful information such as where you can link floors together such as common stairways.

Do You Need a Measured Survey Quote?

Planning & Initial Sketches

The first thing to do on your sketch pad is to open a fresh new page and write the following at the top of each page:

  • Job Name:
  • Job Date:
  • Page No: 1 of (BLANK FOR NOW).

Having these details on each page is important to allow easy future reference. Usually, different sketches look very similar to one another so the organisation is very important.

Once you have decided which floor to start your measured survey on, you can begin the process of measuring out and surveying the property. The first thing to do is to produce a sketch of the property and start adding dimensions.

Starting in one corner of the building begin by sketching out the shape of the room you are in. Using the squared paper helps to draw straight and diagonal lines. The sketch pads have 5mm squares, the general rule of thumb we use is to treat each square as 200mm in real life. So if you are drawing a door, for instance, (usually 800 mm or so) then the width of the door on the page will be 4 squares (200mm x 4). Using this approximation to draw out the floor plan will help as you will produce a sketch layout that is a bit more representative of the property.

When sketching out a room, imagine a line going around your room at 1 metre above the floor level. It is this line that we will sketch out and measure for our floor plan measurements.

Once you have decided which floor to start your survey on, you can begin the process of measuring out and surveying the property. The first thing to do is to produce a sketch of the property and start adding dimensions.

Starting in one corner of the building begin by sketching out the shape of the room you are in. Using the squared paper helps to draw straight and diagonal lines. The sketch pads have 5mm squares, the general rule of thumb we use is to treat each square as 200mm in real life. So if you are drawing a door, for instance, (usually 800 mm or so) then the width of the door on the page will be 4 squares (200mm x 4). Using this approximation to draw out the floor plan will help as you will produce a sketch layout that is a bit more representative of the property.

When sketching out a room, imagine a line going around your room at 1 metre above the floor level. It is this line that we will sketch out and measure for our floor plan measurements.

Key Symbols We Use

How To Measure

How To Measure A Room In Plan

To measure a room is fairly simple. You will need to utilise your tape measure and laser distomat to record the lengths, widths and openings of walls, doors and windows. In rooms that aren’t perfectly square you may need to take corner to corner measurements using your laser.

To allow your laser to get right into the corner you may have to pull out an extension piece on the back of the device. Once out it is usual for the lasers to measure from this back piece meaning you don’t have to adjust. It is of course, worth checking.

When measuring from corner to corner it is often difficult to measure directly into the corner as your handshakes and causes the beam to move. One method we have had success with is to use a MAX/MIN mode on the laser. The Leica lasers allow us to take continuous measurements and then present us with the longest and shortest dimensions. If you are measuring from a corner to a corner then the longest (MAX) dimension will always be the correct one.

When writing down your floor plan dimensions it is recommended that you use the red colour using your multi-colour pen. You should write in your notes the measurement plus the location of where this distance was taken from and to. We also recommend writing down your measurements in millimetres. There is nothing worse than getting back to the office and not being able to read a scruffy measurement.

Once you have taken your overall lengths and diagonals we now need to work out a way around the room and add more dimensions. Start in one corner and work your way round in a clockwise manner, recording the dimensions as you go.

With doors, we usually measure the door size and general outline frame details. Usually, these are the same across a property so don’t feel like you need to measure each door! With windows, we usually measure to the structural opening of the window rather than to the frame. This can be a little tricky sometimes depending on the window type and framing.

Measuring a Building Room Drawing

How To Measure a Angled Room

Accurately measuring an angled room is important to ensure you correctly show the proportions which will help with planning what you need to do in the room and surrounding area.

What you will need:

  • Tape measure or laser
  • measurement device
  • Notepad + Pen (for the survey)
  • Drawing paper (squared paper is sometimes easier)
  • Drawing compass
    Ruler

Measurement Stage

Step 1

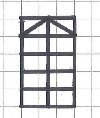
Start by drawing the room on your notepad. Include all the elements you want to measure. A minimum I would recommend is the walls, doors and windows.

Make sure you draw the room big enough to ensure you can easily add on measurements and notes. This will serve as our survey notes, we shall draw up a better version later.

Step 2

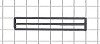
Once you have drawn the room up it is time to start measuring. The first thing we will do is choose the longest straightest wall as our first measurement.

Using your tape/laser measure this will and draw the line on your bit of paper. Write the measurement of this wall under the line as follows.

Floor Plan angled room example

Step 3

Now we have our first line we can use this to measure the remaining angled walls. In the example below, we will work clockwise around the room starting at the top left position. We are going to use a triangle method to work out the position.

The principle is to measure the corner of a wall with enough points to make a triangle. In the example below, you will see what I mean. The purpose of using a triangle method is that we can use our drawing compass at a later stage to find this wall point.

Step 4

Use the triangle method to measure in the remaining wall corner points in your room. Make sure you always try to use the first line we measured as a source point for your measuring points. By always using this line you are minimising your errors.

Floor Plan Angled Room Drawing

measuring an angled room

Step 5

Once you have completed this you should have the following measurements (see green dashed lines). If you have all of these then we can proceed to the scaled drawing stage.

floor plan angled room drawing

Producing Your Scaled Drawing

In this section, we will explain how your previously surveyed notes can now be drawn on a piece of paper to scale. The same principles discussed here can be translated into CAD quite easily. For instance, instead of using a drawing compass you should use the circle feature to set a circle at the correct radius etc.

Step 1

Take a fresh piece of paper and decide upon a suitable scale to draw your room at. Perhaps a good scale to start with would be 5 cm on the page to equal 100 cm in real life. This scale would be called 1:20 as every 1 cm on the page would equal 20 cm in real life. When deciding your scale be careful to make sure your room will fit on the page and that it isn’t too small to be seen (too big or too small).

Step 2

Once you have decided your scale it is now time to grab your pencil, ruler and compass and start drawing your walls! Start by using your ruler to draw your initial line that you first measured. Make sure you draw the line to the correct scale. For instance, if you have decided on your 1:20 scale a 350 cm line would equal 17.5 cm on your page (350 / 20).

Step 3

Once you have drawn your initial line in we can grab our compass and start the process of drawing our angled lines in. If we start in a clockwise manner as per the image below. First of all start by using your ruler to set your compass to your first measurement at the correct scale. In the example below if we start with the line which we measured in at 687.7 cm.

Set your compass to the correct size by scaling the line based on the scale you are using. In this example, the 687.7 cm line would equal 34.4 cm (687.7/20). Set the point to point measurement of the compass to 34.4 cm.

Step 4

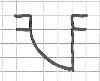
Once you have set the measurement of the compass place one of the points on the starting corner (see below).

The next step is to rotate the compass about this point in an arcing motion and mark the paper with this arc.

Step 5

Move on to the next measurement, in this example, the next measurement will be the one reading 361.7 cm. Like the step above, scale the measurement, set your compass to this size and then arc the measurement round in the approximate direction of the corner you are trying to find.

Once you have done this correctly you will have 2 arcs that should cross over each other. This is the location of your first corner!

Floor Plan Angled Room

Step 6

To obtain the remaining wall corner points you would need to follow the process as per Step 5. Using this arcing technique to locate the point works well however try and make sure the points you are referencing from aren’t too close to each other in terms of the angle between them (see below).

Once you have done this process for all the wall corner points you can now use your ruler to do a dot to dot exercise and join your points. You should now have a basic scaled wall outline of your room!

Floor Plan - for Angled Room

Measuring a Building Room Drawing

How To Measure A Room In Height

Once you have measured the dimensions of the room, start taking height measurements. Start by measuring the cill height and window height of each window in the room. Using the blue colour pen write these dimensions down next to each window (CH = 1205) (WH = 1300), etc.

Have a look at the ceiling and see if the level changes anywhere within the room. Measure the ceiling heights and if possible the locations of ceiling height change. For ceiling heights, we recommend using a blue pen and recording the heights in brackets, e.g. (2300).

Pay attention to the locations of beams on ceilings as their location and height will need to be noted. It’s recommended that you illustrate beams using a dashed line on your plan. Make sure you pick up the underside height – this is important!

Finish the room by measuring the door heights and calling these up as (DH = 2100). Use a blue pen to illustrate heights.

Have a quick check around the room to make sure you have picked up as many crucial dimensions as possible. If the room doesn’t look square then pay extra attention to picking up as many diagonals as possible – these will help when you get back to the office!

Measuring a Building Room Heights Drawing

How To Link and Align Rooms To Each Other

At some point, usually, very quickly into the measuring process, you will need to accurately link one room with another. To do this we recommend using diagonal measurements if possible, or what we like to call ‘super dimensions’ between rooms.

If you can record a diagonal measurement from one room to another then this is great. Once you have sketched it out then add these dimensions in as necessary. Often we cannot get these and have to use other methods.

The first method is to measure wall thickness. The best place to do this is at a door location. Take extra care when measuring at the door location as there is usually a frame around the door which needs to be taken into account to get a true thickness.

Another method is to do a ‘super dimension’ from one room to another to locate a wall outside of that room. It is important when taking long super dimensions to ensure the laser is as horizontal as possible and that you are measuring on to pieces of wall that are square with each other. If the building is partially angled, this method isn’t useful as it relies on the walls being parallel to each other.

If there is a possibility of taking a dimension from the front to the back of the property or the total width of the property, it’s advisable to take those dimensions.

Measuring Between Rooms When Measuring a Building Drawing

How To Measure Stairs and Steps

When measuring steps and stairs we need to ensure we accurately pick up the plan and height positions. While working in plan view we can treat the steps as normal objects to sketch and measure out. When measuring the location of steps we recommend surveying the extent of the nosing. If your stair goings are a standard with then you can measure the location of the bottom and top stair nosing and count the stairs in between to average out the lengths.

For stairs, we recommend using a green colour to show the locations so you can easily tell what they are.

When measuring the heights of stairs the preferred way is to measure the overall height difference between the floors and then divide this between the number of risers. For example:

Stair Height = Finished Floor Height Difference / Risers

For tricky staircases, we recommend doing a separate sketch and perhaps a section through to understand the layout. It is recommended that features like landings between floors are sketched out as their floor with enough linking dimensions to the floors above and below. Sometimes it is useful to take ceiling dimensions on landings as this can help with your finished floor heights.

Measuring Stairs Drawing

How To Measure For Sections

The first thing to do is to decide where your section will be going through and which way the slice will be looking through your building. Often a long and wide section through the property is requested as a minimum. Your section drawing should try and pass through the exact location as you go up or down in the building.

Once you have decided the section location, sketch it out using your notepad. Take your time with this as it is usually a little bit more confusing than a standard floor plan.

Your sections should ideally be measured after you have completed your floor plans, as there will be dimensions you can use from your plans on your sections such as ceiling heights, room widths, window heights etc.

With your section, you must pick up tricky ceiling levels such as in stair areas and that you have all the important dimensions to accurately locate them in plan and height.

Measuring Sections Drawing

Do You Need a Measured Survey Quote?

How To Measure The Roof / Loft

Before measuring in the loft it is crucial to ensure you have safe access. This is usually provided by a sturdy loft ladder, safely pulled down from the loft hatch area. If you are using an ordinary ladder to access the loft then ensure that the footing is good, that the angle to the loft hatch is within the ladder’s tolerance and that you have someone holding it as you climb up.

Once in the loft, the first thing to check is that safely boarded and whether you can safely move around. If this is the case then the next thing is to hope is that it isn’t full to the brim with belongings!

Before entering the loft, it’s advised that you measure the loft hatch extents and position by measuring back to common walls on your sketch pad. Once in the loft, use your laser and tape to measure the structural timber sizes and approximate centres. If you can measure these from either the loft hatch or a wall within the loft then this is good practice. Take plenty of dimensions whilst up there and if possible try and get the extent of the loft by measuring between walls etc.

For the levels of the loft as well as the roof it is a good idea to reference the finish floor level of the loft down to the floor below. Use your laser to pick up this dimension. Whilst you cannot measure the full roof heights, you can get a good idea of the measurements by measuring the distance from the floor level to the underside of the ridge beam, then measuring or estimating the height of the beam to the underside of the roof. You can then give the roof a thickness based on a bit of research in the house type you are in.

Whilst in the loft it is also a good idea to measure the angle of various elements such as the rafters. This will help position the elements on a section and the plans. Some laser distomats have angle meters that you can use; at a push, you could probably use a phone with a decent app. Use apps with extreme caution, however, as they can be unreliable.

How To Measure The Eaves

Measuring the underside of the eaves from the ground is important to get the correct level of the roof. This can be done by measuring up from the outside using your laser distomat. The important thing is to relate this outside ground level to your floor levels within the house. Try to pick a solid point on relatively flat ground that can be easily linked back to your finished floor level. Often the back or front door works well. Check the eaves height doesn’t change as you go round the building!
Measuring Loft Drawing

How To Measure Between Floors

Floor height measurements are important for elevations and sections and should be carefully measured. If possible the dimensions should be measured down from each floor to a commonplace on the ground floor.

If this cannot be done then carefully measure between floors using your laser. It is sometimes worth considering measuring out of an external window to a common ground point outside to improve accuracy. Another method is to assume curtail ceiling levels are horizontal and use these as references in combination with floor levels to work out the dimensions.

When taking floor heights, ensure you record the levels as either Structural Floor Level (SFL) or Finished Floor Level (FFL). Carpets and hard flooring in the property can sometimes cause issues. It is worth recording the thickness of particular floor levels if you think they will be relevant.

Measuring Between Floors Drawing

How To Measure External Areas

Depending on the complexity of the external areas such as the front and rear garden it may be possible to measure external areas without the use of an expensive piece of kit such as a total station. When in external areas it is recommended to draw out the area, like you would a floor plan, and measure items from known things.

For instance, if you are measuring a tree next to a fence line, start by measuring and positioning the fence line relative to the external wall of the house. Then measure back to the external wall, measure the tree offset from the house and then measure the offset from the fence line. When outside it’s recommended that you pick up important elements such as trees near to the property, inspection chambers, paths, rainwater pipes (RWPs), soil vent pipes (SVPs), steps and other useful items that would be good to know for future design purposes.

When lifting inspection chambers take care not to injure yourself and make sure you wash your hands thoroughly after handling the lid. Measure down from the finish floor level of the house to the lid level if possible, then use your laser to measure down to the bottom of the pipe from the lid to get your invert. Ensure your client is aware of how you plan to measure drainage as accuracy can be important for drainage designs; you may need to use a level or a total station to get accurate information.

Measuring External Areas Drawing

How To Measure For Elevations

If you need to produce elevations, then most of the information you require will be sourced from your floor plan and section drawings. Elements such as the window positions and heights will have been already surveyed internally.

When producing elevations, it is important to be as accurate as possible. If it is safe to do so, measure as much as you can whilst outside and on the ground floor. Items such as typical window cill details and extents are useful to pick up. Where you can pick a common ground point so you can reference the height back and measure up from this point. With this, you can get points like the ceiling levels of porches, steps, wall heights, etc.

Measuring For Elevations Drawing

Useful Tips

  • Always try to aim your laser as level as possible to avoid incorrect measurements
  • Pay attention to where your laser is taking its measurements from (front, back etc)
  • Use your laser with caution when measurement 50 mm or less, use a tape if need be
  • Record the dimensions regularly and with care so as you don’t get confused
  • Avoid long distance tape measures; use them for tricky measurements or less than 50mm
  • When recording heights ensure you are measuring as vertically as possible
  • Using baseline measurements rather than continuous measurements improves accuracy
  • Take care when measuring kitchens as bathrooms with wall tile thicknesses
  • Get a good idea of what the survey is for and the required accuracy levels

Photographing The Property

Once you are all measured up, ensure you take plenty of photos. These will prove extremely valuable when you are back in the office as they will help you to draw up from your notes.

When we say plenty of photos, we mean hundreds – sometimes over a thousand depending on the size of the property! In each room make sure you take plenty of photos to pick up all measured details such as doors, chimney breasts, nooks, windows, steps stairs, etc. Go through the property methodically from room to room and take photos carefully as to not blur. Make sure there is plenty of light by turning lights on if possible.

While outside ensure you get plenty of photos of the property from multiple angles. If you have complex roofs or other complicated areas, try to take photos of these from the outside. If this isn’t possible and it is safe to do so, try and get a photo from inside by hanging your arm outside to take an external photo (use extreme caution).

Wrapping Up & Leaving The Property

You must leave the property in the condition you found it. Check that doors and windows you have unlocked are locked, lights are switched off, etc. Ensure you have everything you came with packed up and ready. Sometimes if you are in a property on your own, once the front door is shut you have missed your chance to go back and pick up something you’ve left behind. It is a good idea to notify your client that you have left and thank them if they have given you tea throughout the day!

Conclusion

Measured surveys are sometimes quite labour-intensive – not only physically but mentally. You must stay focused on the task throughout the day to ensure your survey results are accurate. Take plenty of water and food with you if there is nowhere nearby to have a break. It is amazing what having a rest with a bit of food and drink does!

The survey quality is only as good as the equipment and methodology used. If you rush through your survey with equipment unreliable equipment, then you can expect trips back to the property to pick up measurements you have missed or are unsure of. Buy quality surveying equipment and take your time.

If you are in doubt in how accurate or quickly you can undertake a survey, consider instructing a specialist measured survey company to undertake the task for you. Professional companies are suitably insured and employ experienced survey teams with the correct equipment to competently undertake the task.

Do You Need a Measured Survey Quote?